Nuke Olaf - Log Store
[Android] 안드로이드 - Data Binding 데이터 바인딩이란 ? 본문
1. data binding 이란?
1. data binding 의 사전적 의미
binding 은 bind 의 현재분사형으로, bind란 단어의 사전적 의미는 다음과 같다.
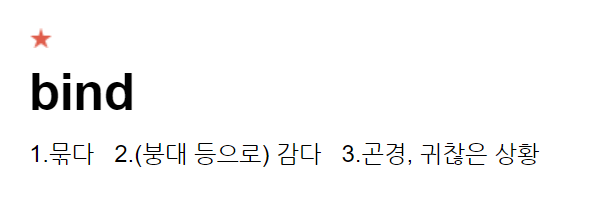
즉, data binding 이라는 단어는 한국어로 "데이터 묶기" 정도의 의미로 해석할 수 있겠다.
데이터를 무언가와 묶어준다?
정확하게 와닿지는 않으니 컴퓨터 프로그래밍에서의 data binding 이란 무엇인지에 대해 찾아보자
2. 컴퓨터 프로그래밍에서의 Data binding
Wikipedia 에서는 data binding 을 다음과 같이 설명한다.
https://en.wikipedia.org/wiki/Data_binding
data binding is a general technique that binds data sources from the provider and consumer together and synchronizes them. This is usually done with two data/information sources with different languages as in XML data binding and UI data binding. In UI data binding, data and information objects of the same language but different logic function are bound together (e.g. Java UI elements to Java objects).
In a data binding process, each data change is reflected automatically by the elements that are bound to the data. The term data binding is also used in cases where an outer representation of data in an element changes, and the underlying data is automatically updated to reflect this change. As an example, a change in a TextBox element could modify the underlying data value.
데이터 바인딩(data binding)은 제공자와 소비자로부터 데이터 소스를 함께 묶어 동기화하는 일반적인 기법이다. 이것은 보통 XML 데이터 바인딩과 UI 데이터 바인딩에서와 같이 서로 다른 언어를 사용하는 두 개의 데이터/정보 소스로 이루어진다. UI 데이터 바인딩에서는 언어와 다른 로직 함수의 데이터 및 정보 객체가 서로 결합된다(예: Java UI 요소와 Java 객체).
데이터 바인딩 프로세스에서 각 데이터 변경은 데이터에 바인딩된 요소에 의해 자동으로 반영된다. 데이터 바인딩이라는 용어는 요소 내 데이터의 외부 표현이 변경되는 경우에도 사용되며, 이러한 변화를 반영하기 위해 기본 데이터가 자동으로 업데이트된다. 예를 들어, TextBox 요소의 변경은 밑줄에 있는 데이터 값을 수정할 수 있다.
2. 그래서, 안드로이드에서의 data binding 이란 무엇인가?
안드로이드에서의 data binding 이란, Android Archictecture Components 의 한 부분으로서
Ui 요소와 데이터를 프로그램적 방식으로 연결하지 않고, 선언적 형식으로 결합할 수 있게 도와주는 라이브러리를 말한다.
안드로이드 공식 문서 Data Biniding Library : https://developer.android.com/topic/libraries/data-binding
데이터 바인딩은 안드로이드에서 공식적으로 지원하는 라이브러리이기 때문에 기존에 비슷한 기능을 하는 "ButterKnife" 라는 써드파티 라이브러리가 있었지만, 보통 버터 나이프 대신 데이터 바인딩을 더 많이 사용한다고 한다.
Ui 요소와 데이터를 프로그램적 방식으로 연결하는것과 선언적 방식으로 결합하는 것은 무슨 차이가 있을까?
TextView 로 내 이름을 보여주는 상황을 생각해보자.
나는 res/layout 에 xml 리소스를 다음과 같이 만들 것이다.
<androidx.constraintlayout.widget.ConstraintLayout
    android:layout_width="match_parent"
    android:layout_height="match_parent"
    tools:context=".MainActivity">

    <TextView
        android:id="@+id/sample_text"
        android:layout_width="wrap_content"
        android:layout_height="wrap_content"
        app:layout_constraintBottom_toBottomOf="parent"
        app:layout_constraintLeft_toLeftOf="parent"
        app:layout_constraintRight_toRightOf="parent"
        app:layout_constraintTop_toTopOf="parent" />

</androidx.constraintlayout.widget.ConstraintLayout>
sample_text 라는 이름의 TextView 에 텍스트를 보여주기 위해서,
기존의 프로그래밍적 방식으로는 MainActivity.java 또는 MainActivity.kt 파일의 onCreate() 와 같은 메서드(UI 프레임워크 메서드를 호출하는 코드) 내에 이런 코드를 작성했다.
TextView textView = findViewById(R.id.sample_text);
textView.setText("올라프");
코틀린에서는 findViewById 를 하지 않아도 되니 이렇게 작성했을 것이다.
sample_text.setText("올라프");
그런데, data binding 을 사용하면, 위 처럼 자바/코틀린 코드를 직접 호출하지 않아도 된다.
레이아웃 파일에서 직접 View에 텍스트를 할당해줄 수 있기 때문이다.
<TextView
    android:text="@{viewmodel.userName}" />
이를 선언적(declarative) 레이아웃 작성이라고 한다.
3. data binding 은 왜 사용할까?
데이터 바인딩을 사용하면, 데이터를 UI 요소에 연결하기 위해 필요한 코드를 최소화할 수 있다.
data binding 을 사용했을 때, 당장 가시적으로 보이는 장점들을 꼽자면 다음과 같다.
- findViewId() 를 호출하지 않아도, 자동으로 xml 에 있는 VIew 들을 만들어준다.
- RecyclerView 에 각각의 item 을 set 해주는 작업도 자동으로 진행된다.
- data 가 바뀌면 자동으로 View 를 변경하게 할 수 있다.
- xml 리소스만 보고도 View 에 어떤 데이터가 들어가는지 파악이 가능하다.
- 코드 가독성이 좋아지고, 상대적으로 코드량이 줄어든다.
또한, 데이터 바인딩은 MVP 또는 MVVM 패턴을 구현하기 위해 유용하게 사용된다
그러나, data binding 이 장점만 있는 것은 아니다.
클래스 파일이 많이 생기고, 빌드 속도가 느려지는 등 단점들도 존재한다.
그래서 data binding 은 data binding 단독으로만 사용하는 것보다 MVVM 또는 MVP 아키텍처과 함께 사용해야 빛을 발한다는 것이 업계의 오피셜인거 같다.
data binding 의 장단점에 대해 좀더 궁금하다면,
https://stackoverflow.com/questions/41462365/what-are-the-pros-and-cons-of-android-data-binding
4. data binding 을 사용하는 방법
1. app/build.gradle 에 dataBinding 요소를 추가한다
android {
    ...
    dataBinding{
        enabled = true
    }
}
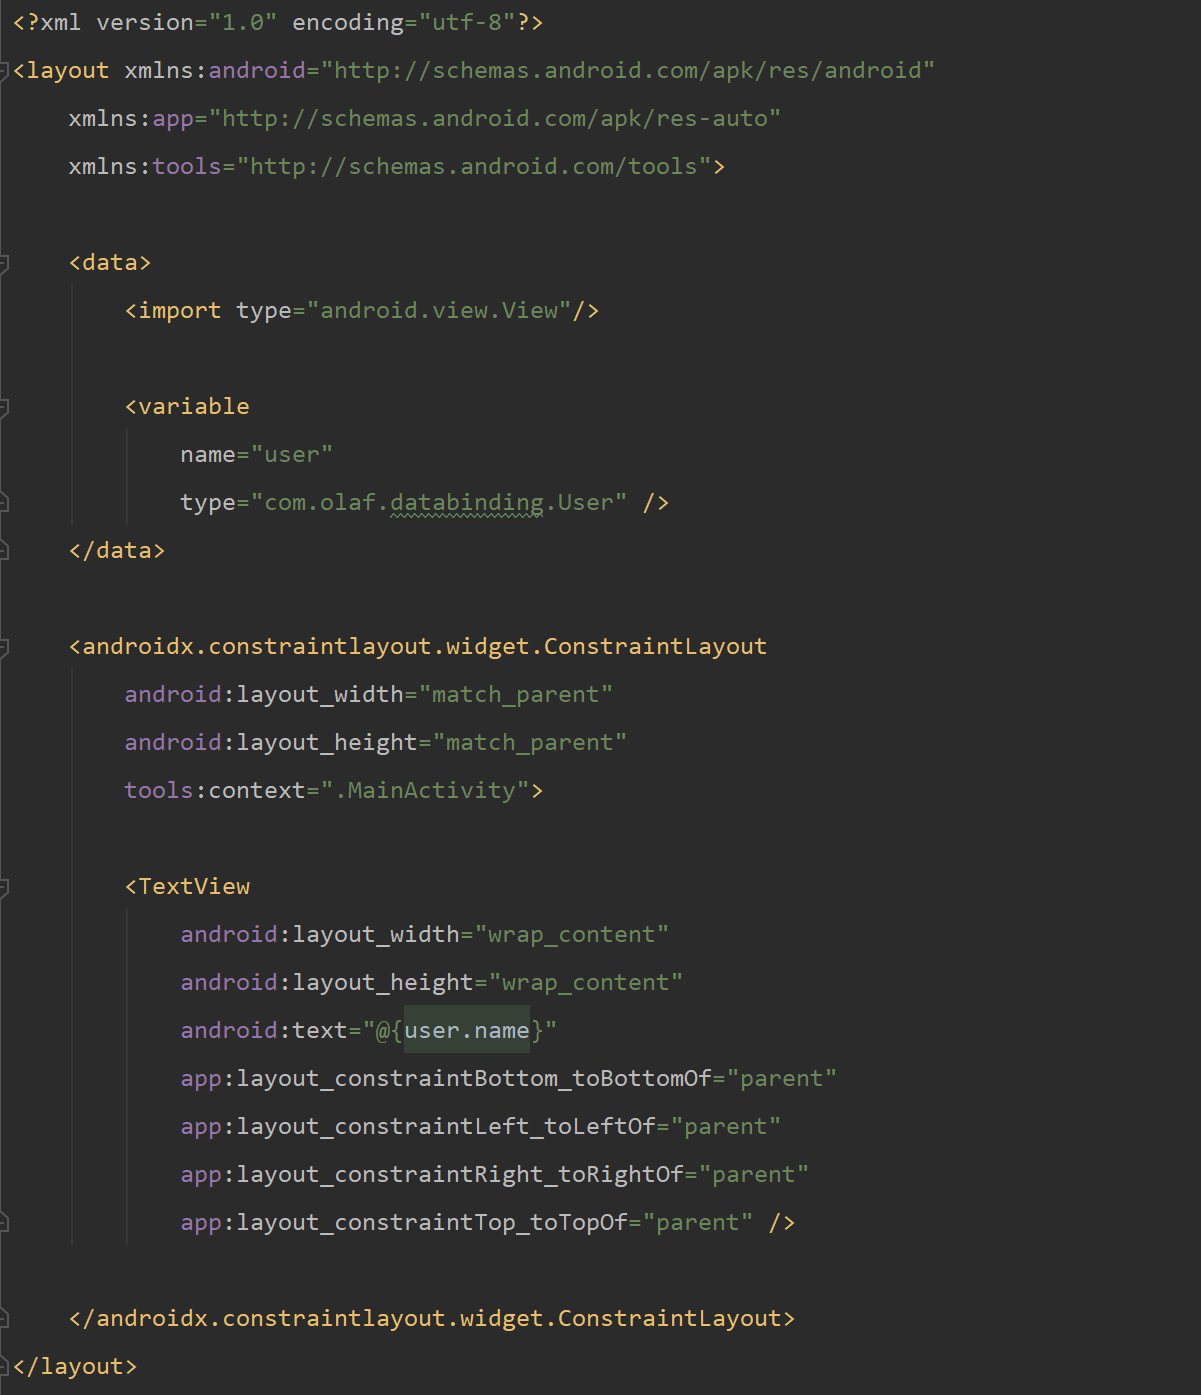
2. <layout> 태그 안에 XML 레이아웃을 작성한다
data binding 을 사용하는 xml 리소스는 <layout> 루트 태그로 시작하여야 한다.
위의 예시에 <layout> 태그를 적용하면 다음과 같다.
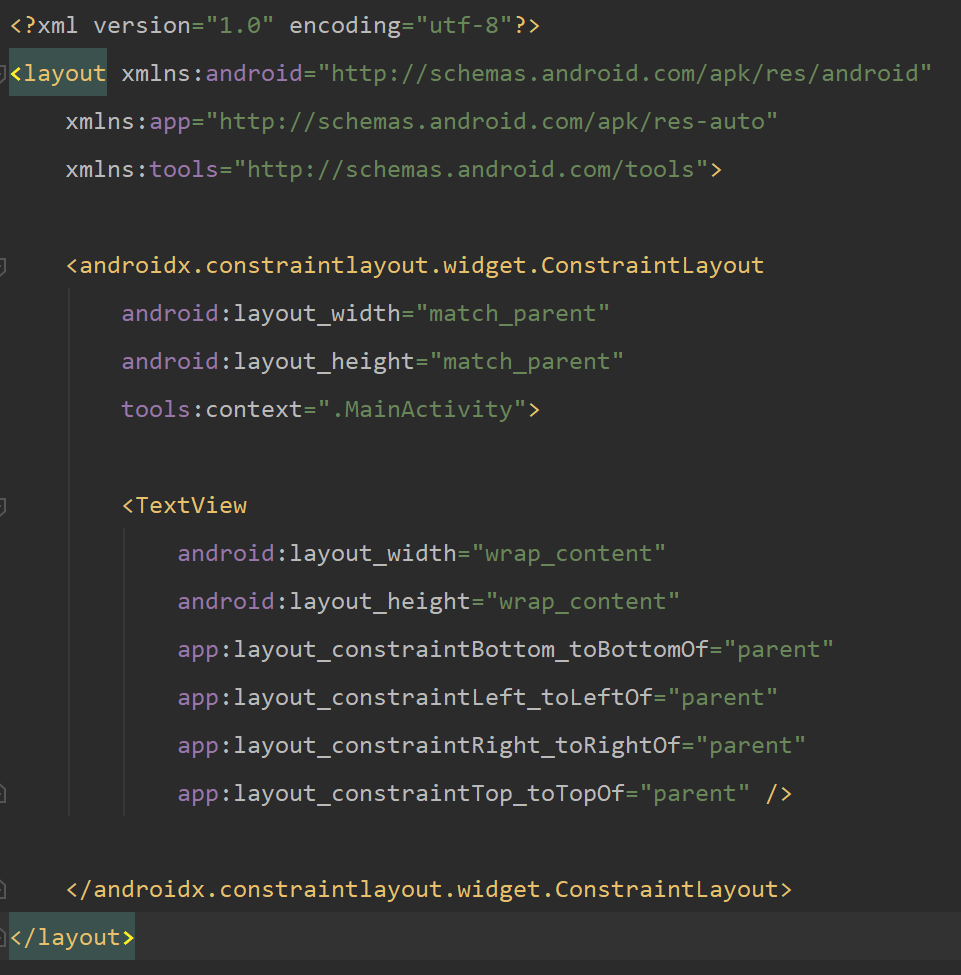
binding class 는 data binding 을 사용하는 클래스의 이름(위의 경우에는 MainActivity)에 따라 각 레이아웃 파일에 대해 뒤에 "Binding" 이라는 suffix가 붙은 Camel Case 로 자동으로 생성된다.
즉, 위의 activity_main.xml 에 대해 자동 생성된 binding class 의 이름은 MainActivityBinding 이다.
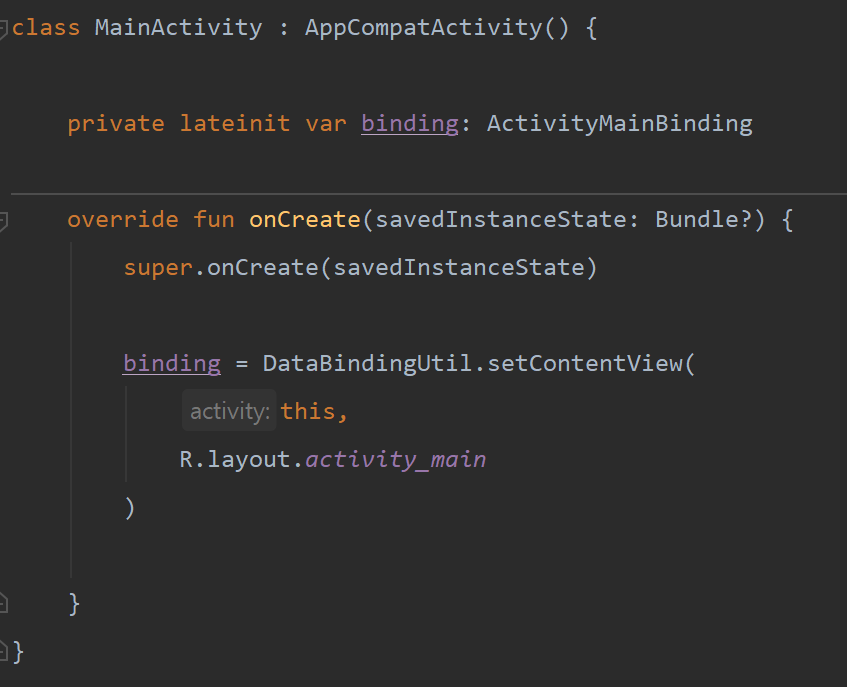
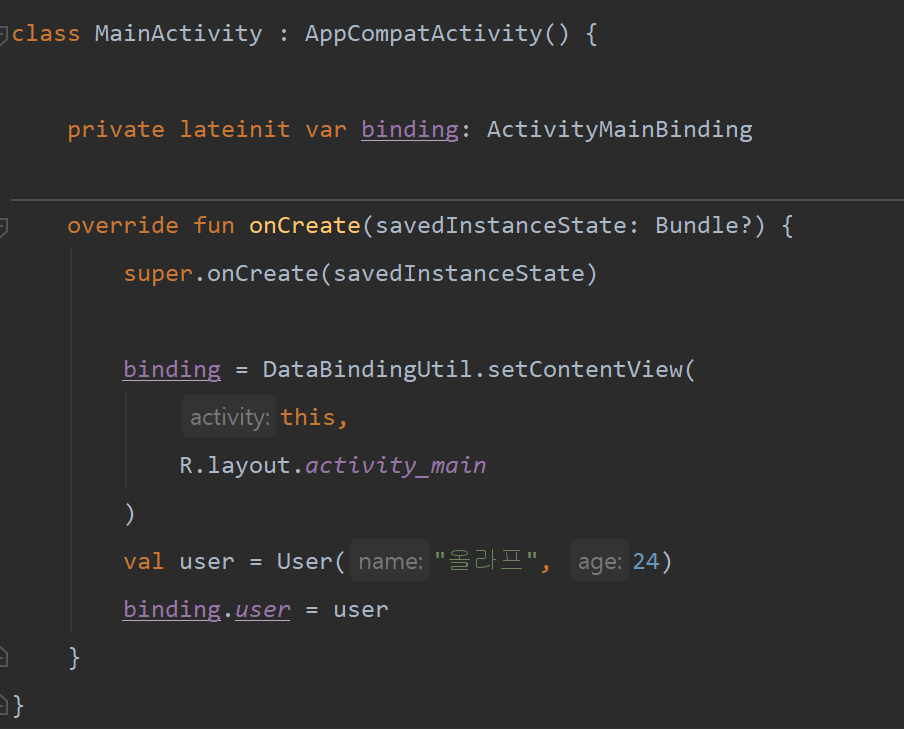
3. Activity 에서 기존의 setContentView() 함수를 DataBindingUtil.setContentView() 로 교체한다.
DataBindingUtil class 의 객체를 생성하고, 기존의 setContentView() 를 DataBindingUtil.setContentView() 로 대체한다.
이제, data binding 을 사용하여 layout 을 관리할 수 있다.
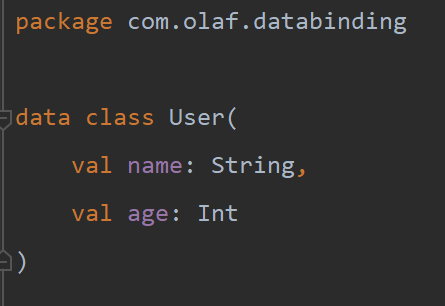
4. view 에 보여줄 이름 data class 를 선언한다.
data 객체를 view 와 bind 하기 위해서, User 라는 이름의 data class 를 하나 만들어줬다.
5. xml 리소스의 <layout> 태그 안에 <data> 요소를 작성해준다.
<data> 태그는 <layout> 에서 사용할 변수를 정의하는데 사용된다.
나는 User 라는 data class 객체를 사용할 것이기 때문에 name 이 user 인 variable 을 하나 선언해 주었다.
레이아웃 내의 표현식은 "@{}" 구문을 사용하여 속성(attribute properties) 에서 작성된다.
나는 TextView 의 텍스트를 user 변수내의 name 프로퍼티로 설정했다.
6. Activity 에서 User 객체를 초기화 해준다
이제, User 객체를 초기화하여 binding 객체의 data source 를 set 해주도록 한다.
참고 사이트 >>>
https://codelabs.developers.google.com/codelabs/android-databinding/#0
https://www.vogella.com/tutorials/AndroidDatabinding/article.html
https://woovictory.github.io/2019/02/04/Android-What-is-DataBinding-1/
https://medium.com/@temidjoy/android-jetpack-empower-your-ui-with-android-data-binding-94a657cb6be1
'Android' 카테고리의 다른 글
| [Android] 안드로이드 - Data Binding 사용시 리사이클러뷰 레이아웃이 이상해질 때 (0) | 2020.05.04 |
|---|---|
| [Android] 안드로이드 - 리사이클러뷰 Data Binding 으로 리팩토링하기 (1) | 2020.05.03 |
| [Android] 안드로이드 - invalid vcs root mapping 오류 (0) | 2020.05.02 |
| [Android] 안드로이드 - 멀쩡하던 프로젝트 레이아웃 리소스에 빨간줄이 뜰때 (0) | 2020.05.02 |
| [Android] 안드로이드 - uri 를 통해 파일의 이름과 크기 가져오기 (0) | 2020.04.28 |


