
Nuke Olaf - Log Store
Ubuntu 18.04 + Apache 2.4.41 수동설치하기 본문
여기서 말하는 수동설치란? : linux 에서 소스를 컴파일하여 설치하는 것을 말한다.
- /usr/local 에 설치하는것이 관례이다.
- 소스파일은 /usr/local/src 에 보관한다.
- 컴파일 설정을 마친 후에는 아래 명령어로 설치를 수행한다.
# ./configure
# make
# make install
참고 : 제타위키 컴파일설치
0. APR, PCRE 와 같은 의존성 패키지 설치
Apache 를 Ubuntu 18.04 에 설치, 및 실행하기 위해서는 APR, PCRE 와 같은 의존성 패키지를 설치해야한다.
APR : https://en.wikipedia.org/wiki/Apache_Portable_Runtime
APR(Apache Portable Runtime)는 아파치 HTTP 서버 2.x.의 핵심이며 휴대용 라이브러리입니다. 이런 APR은 고급 IO 기능(예:sendfile, epoll and OpenSSL 등)에 대한 접근을 포함하여 OS 수준의 기능 (난수 생성, 시스템 상태), 그리고 기본 프로세스 처리(공유 메모리, NT 파이프와 유닉스 소켓) 등 많은 용도로 사용되고 있습니다.
PCRE : https://en.wikipedia.org/wiki/Perl_Compatible_Regular_Expressions
PCRE( Perl Compatible Regular Expressions )는 펄 호환 정규 표현식으로서, 정규식 패턴 일치를 구현하는 함수의 집합입니다. 요즘에는 Apache, PHP, KDE 등을 포함한 오프 소스 프로젝트에서 사용되고 있으며, 아파치 2.4 버전을 설치할 때는 pcre를 설치해야 합니다
1. 소스 코드를 저장할 디렉토리를 미리 만들어둔다
https://araikuma.tistory.com/103?category=779808
https://araikuma.tistory.com/103?category=779808
$ sudo su
# cd usr
# cd local
# mkdir apache
/usr/local 디렉토리에 apache dir 를 만들었다.
*** linux 의 디렉토리 구조를 몰라서 삽질했다.
https://webdir.tistory.com/101
https://www.thegeekstuff.com/2010/09/linux-file-system-structure/
2. /usr/local 에 apr 과 apr-util 을 다운 받고 압축을 해제한다
apr 주소 : http://mirror.navercorp.com/apache//apr/apr-1.7.0.tar.gz
apr-util 주소 : http://mirror.navercorp.com/apache//apr/apr-util-1.6.1.tar.gz
# wget http://mirror.navercorp.com/apache//apr/apr-1.7.0.tar.gz
# wget http://mirror.navercorp.com/apache//apr/apr-util-1.6.1.tar.gz
# tar xvfz apr-1.7.0.tar.gz
# tar xvfz apr-util-1.6.1.tar.gz
sha256 이라고 해서 아래처럼 checksum 도 받으라는 얘기가 있는데, 일단은 생략했다.
$> wget https://www.apache.org/dist/apr/apr-1.7.0.tar.gz.sha256
$> sha256sum --check apr-1.7.0.tar.gz.sha256
apr-1.7.0.tar.gz: OK
wget 은 web get 의 약어로, 웹상의 파일을 다운로드 받을 때 사용하는 명령어이다.
tar xvfz 는 tar.gz 형식으로 압축되어있는 파일을 압축해제하는 명령어이다.
여기서는 tar.gz 형식으로 압축되어있는 apr 과 apr-util 을 압축해제할 때 사용한다.
apr 과 apr-util 을 다운받고, 압축을 해제하였으니 이제 각 폴더로 이동해서 설치를 해야한다.
3. apr 과 apr-util 을 설치한다. (apr-util 설치 이전에 apr 설치가 선행되어야한다)
3-1. apr 설치
아래의 명령어는 apr 의 설치파일을 만들고, 설치하는 것이라고 생각할 수 있다.
$ cd usr/local/apr-1.7.0
$ ./configure --prefix=/usr/local/apr
$ make
$ make install
./configure --prefix=/usr/local/apr 라는 명령어는 어떤 파일을 /usr/local/apr 에 설치하겠다는 뜻이다.
make 는 소스를 컴파일한다는 뜻이다. 컴파일이라는 것은 소스파일을 사용자가 실행가능한 파일로 만들어주는것이다. make 과정이 끝나고 나면 설치파일이이 생성된 상태이다. 여기서 중요한 것이 make 에게 어떤 프로그램을 컴파일하고 링크해야하는지 방법을 설명하는것인데 그게 makefile 이다. make install 은 make를 통해 만들어진 설치파일을 설치하는 과정이다.
error (1) : no acceptable C compiler found in $PATH
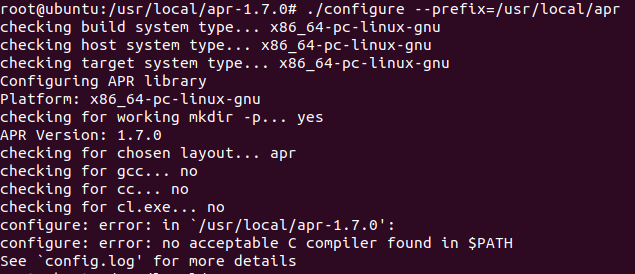
음.. 근데 나는 no acceptable C compiler found in $PATH 라는 에러문구가 뜬다.
이 오류는 컴파일러를 찾지 못해서 생기는 오류라고 한다. (참고링크)
이 문제를 해결하기 위해서는 apt-get 명령어로 컴파일러를 설치해야한다. http://taewan.kim/tip/apt-apt-get/
$ apt-get install gcc
error (2) : cannot remove 'libtoolT' : No such file or directory

이번에는 cannot remove 'libtoolT' : No such file or directory 라는 에러 문구가 뜬다
이때는 cp -arp libtool libtoolT 라는 명령어를 입력후 다시 설치를 진행하면 된다.
$ cp -arp libtool libtoolT
error (3) : Command 'make' not found, but can be installed with apt install make apt install make-guile
make 명령어를 입력했는데 또 이런 문구가 뜬다

Command 'make' not found, but can be installed with
apt install make
apt install make-guile
system PATH 에 명령 작성 명령이 없기 때문에 아래의 명령어로 make 를 제거하고 다시 설치해야 한다.
$ apt-get install --reinstall make
3-2. apr-util 설치
이제 apr 설치가 다 되었으면, apr-util 을 설치해주면 된다.
$ cd usr/local/apr-util-1.6.1
$ ./configure --with-apr=/usr/local/apr --prefix=/usr/local/apr-util
$ make
$ make install
error (1) : xml/apr_xml.c:35:10: fatal error: expat.h : No such file or directory
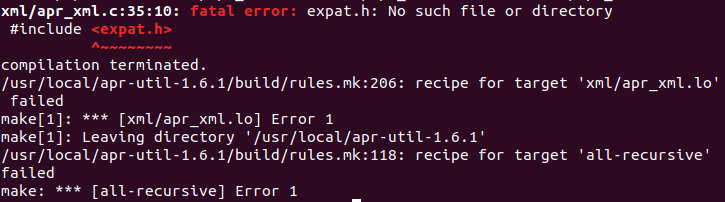
또 에러가 뜬다. xml/apr_xml.c:35:10: fatal error: expat.h : No such file or directory
검색하다보니 지금까지 내가 마주했던 에러들과 똑같은 에러를 직면한 사람이 정리해놓은 글이 있었다. 링크
libexpat1-dev 라는 패키지가 없어서 뜨는 에러로, apt-get install libexpat1-dev 명령어로 해결할 수 있다고 한다.
$ apt-get install libexpat1-dev
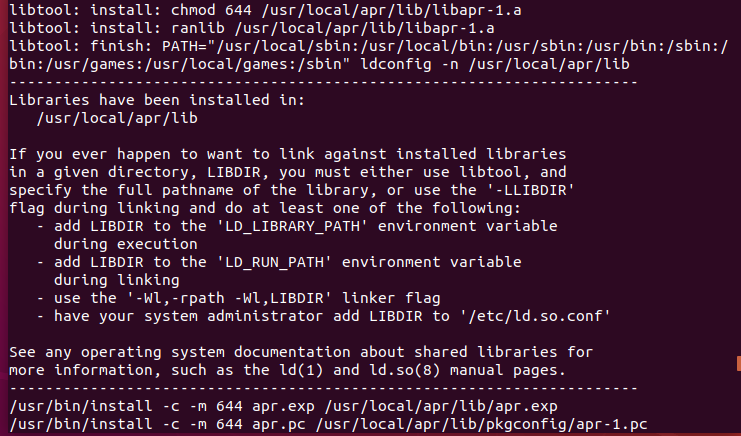

apr 과 apr-util 이 설치되었다.
4. /usr/local 에 PCRE 를 다운, 압축해제, 설치한다.
http://pcre.org/ : 해당 홈페이지의 Download 부분을 참고하여 다운받을 수 있다.
PCRE2 와 PCRE 가 있다. Apache2.4X 대 버전이라면 PCRE 를 다운받아야 한다.
ftp://ftp.pcre.org/pub/pcre/pcre-8.43.tar.gz
$ cd usr/local
$ wget ftp://ftp.pcre.org/pub/pcre/pcre-8.43.tar.gz
$ tar xvfz pcre-8.43.gar.gz
$ cd usr/local/pcre-8.43
$ ./configure --prefix=/usr/local/pcre
$ make
$ make install
error : configure: error: Invalid C++ compiler or C++ compiler flags
./configure --prefix=/usr/local/pcre 명령어를 입력했는데 에러가 떴다.
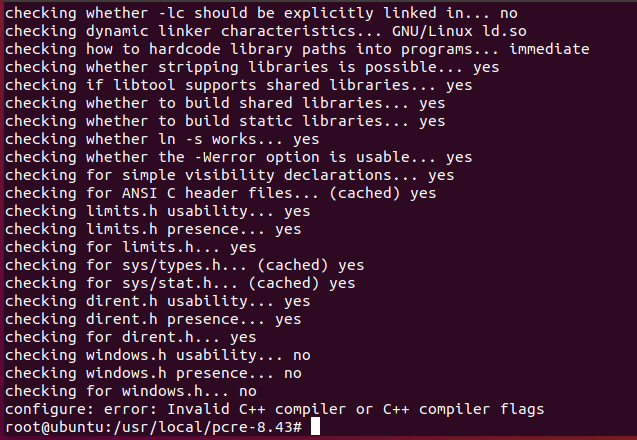
g++ 라는 C++ 컴파일러가 없어서 생긴 에러이다. apt-get install g++ 명령어로 해결하면 된다.
$ apt-get install g++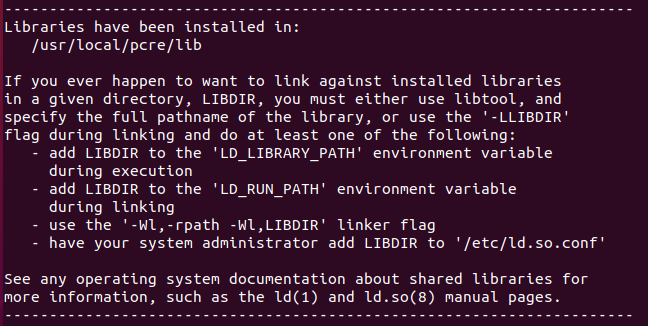
pcre 가 설치되었다.
5. Apache 2.4.41 을 설치한다
Apahche 공식 사이트에서 설명하는 컴파일 설치 링크 : http://httpd.apache.org/docs/current/install.html
컴파일과 설치 - Apache HTTP Server Version 2.4
컴파일과 설치 이 문서는 최신판 번역이 아닙니다. 최근에 변경된 내용은 영어 문서를 참고하세요. 이 문서는 유닉스와 유닉스류 시스템에서 아파치를 컴파일하고 설치하는 것만을 다룬다. 윈도우즈에서 컴파일하고 설치하는 방법은 마이크로소프트 윈도우즈에서 아파치 사용을 참고하라. 다른 플래폼에 대해서는 플래폼 문서를 참고하라. 아파치 2.0의 구성과 설치 환경은 1.3과 매우 다르다. 아파치 1.3은 쉬운 설치를 위해 자체 스크립트를 사용했다. 아파치 2.0은 이
httpd.apache.org
http://httpd.apache.org/download.cgi : 해당 링크로 들어가서 필요한 버전의 아파치 다운로드 링크를 확인한다
Stable Release - Latest Version 에서 최신버전을 확인 할 수 있다.
/usr/local 에 apache 를 다운로드 받고, 압축을 풀어준다.
$ cd /usr/local
$ wget http://apache.tt.co.kr//httpd/httpd-2.4.41.tar.gz
$ tar xvfz httpd-2.4.41.tar.gz
apache 는 다운받는데 시간이 조금 걸린다... 천천히 기다리자

다운이 완료되면, configure, make, make install 명령어로 설치하고 실행시키도록 한다.
$ cd httpd-2.4.41
$ ./configure --prefix=/usr/local/apache2.4 \
--enable-module=so --enable-rewrite --enable-so \
--with-apr=/usr/local/apr \
--with-apr-util=/usr/loacl/apr-util \
--with-pcre=/usr/local/pcre \
--enable-mods-shared=all
$ make
$ make install
configure 스크립트를 이용해서 아파치 소스 트리를 구성한다. 기본옵션을 사용하여 소스트리를 구성하려면 ./configure 를 입력하면 된다. 기본옵션을 수정하려면, ./configure 에 여러 변수와 명령행 옵션을 사용한다. 예제에서 사용한 옵션들이 무엇인지 알아보자. 자세한 Configure script 설명은 링크
아래는 apache httpd 2.4 configure script 의 예시이다.
./configure --prefix=/usr/local/httpd24 \
 --enable-so \
 --enable-rewrite \
 --enable-mods-shared=most \
 --enable-ssl \
 --with-ssl=/usr/local/openssl-1.0.2k/ \
 --with-mpm=event \
 --enable-mpms-shared=all \
 --enable-rewrite \
 --with-apr=/usr/local/apr/bin/apr-1-config \
 --with-apr-util=/usr/local/apr/bin/apu-1-config \
 --enable-nonportable-atomics=yes \
 --enable-deflate  \
 --enable-expires \
 --enable-headers \
 --enable-proxy \
 --enable-http2 \
 --with-nghttp2=/usr/local/nghttp2
--enable-module=shared : 모듈을 실행중에 포함하거나 뺄 수 있는 공유객체(shared object, DSO)로 컴파일한다.
* DSO (Dynamic Shared Objects, DSO) 동적공유객체란? : 아파치 웹서버는 관리자가 모듈들을 선택하여 서버에 포함할 기능을 결정할 수 있는 모듈화된 프로그램이다. 서버를 컴파일할때 httpd 실행파일에 정적으로 모듈을 컴파일할 수 있다. 아니면 모듈을 httpd 실행파일과 분리하여 DSO(동적공유객체) 로 컴파일할 수 있다. DSO 모듈은 서버를 컴파일할 때 컴파일하거나, Apache Extension Tool 을 사용하여 나중에 컴파일하여 추가할 수 있다.
--enable-rewrite : mod_rewrite가 제공하는 규칙기반 URL 조작 기능을 사용한다.
--enable-so : mod_so가 제공하는 DSO 기능을 사용한다. --enable-mods-shared 옵션을 사용하면 자동으로 이 모듈을 포함한다.
configure 를 마치면 다음과 같은 메시지가 출력된다.

error : Makefile:48: recipe for target 'htpasswd' failed
make 명령어를 입력했는데 아래와 같은 에러가 떴다.
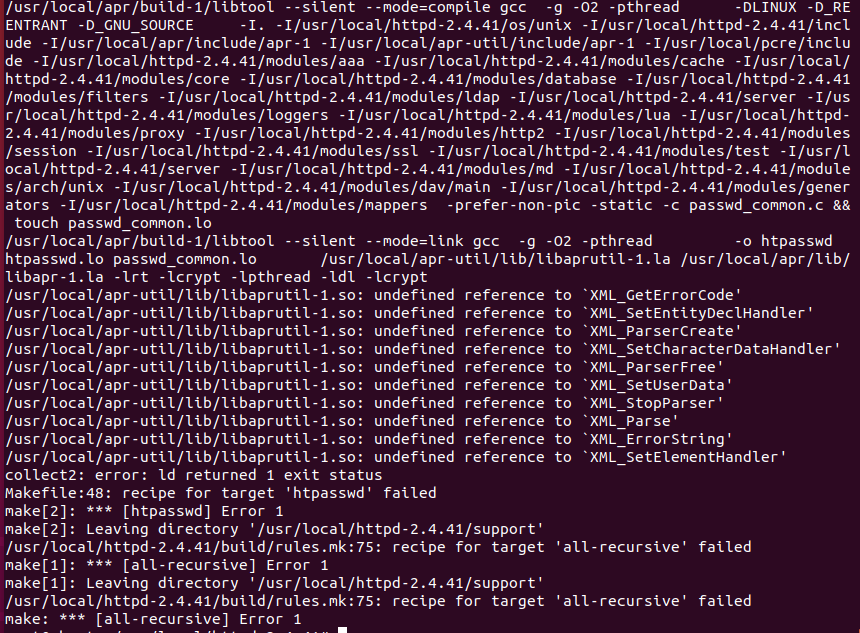
해결방법 : https://stackoverflow.com/questions/50865511/makefile48-recipe-for-target-htpasswd-failed
해결방법을 찾아보니, GNU autoconf , GNU Automake, GNU libtool 을 설치해야한다고 한다. GNU 사이트 링크
$ cd /usr/local
$ wget http://ftp.gnu.org/gnu/m4/m4-1.4.18.tar.gz
$ tar xvfz m4-1.4.18.tar.gz
$ cd m4-1.4.18
$ ./configure
$ make
$ make install
$ cd /usr/local
$ wget http://ftp.gnu.org/gnu/autoconf/autoconf-2.69.tar.gz
$ tar xvfz autoconf-2.69.tar.gz
$ cd autoconf-2.69
$ ./configure
$ make
$ make install$ cd usr/local
$ wget http://ftp.gnu.org/gnu/automake/automake-1.16.tar.gz
$ tar xvfz automake-1.16.tar.gz
$ cd automake-1.16
$ ./configure
$ make
$ make install$ cd /usr/local
$ wget http://ftp.jaist.ac.jp/pub/GNU/libtool/libtool-2.4.6.tar.gz
$ tar xvfz libtool-2.4.6.tar.gz
$ cd libtool-2.4.6
$ ./configure
$ make
$ make install
아.. 그래도 해결이 안된다. 일단 된다는거는 다해보자는 심정으로 아래 명령어 입력
$ apt-get install libexpat-dev
아.. 그래도 해결이 안된다. 메시지를 가만히 보다보니 apr-util 부분에서 뭔가 문제가 있는것 같다. 그래서 apr-util 을 삭제하고 다시 설치한 다음 다시 실행하니 make 와 make install 이 다 잘된다. 왜 잘되는지 잘 모르겠고 되니까 무서운데 일단은 넘어가는걸로 하자! ^^
아파치 설치가 다 되었으니 이제 실행해보자.
실행시키는 명령어 : (-k start 와 start 가 있는데, -k start 는 httpd 가 죽으면 재시작한다는 뜻이다. 실행시키는 명령어가 있다면 종료시키는 명령어도 있겠지? 종료시키는 명령어는 -k stop 또는 stop 이라고 한다)
$ sudo /usr/local/apache2.4/bin/httpd -k start
$ ps -ef|grep httpd|grep -v grep
$ sudo netstat -anp|grep httpd
$ sudo curl http://127.0.01
httpd -k start 는 Apache 를 실행하는데 사용되는 명령어이다.
-k start 명령어로 실행시키려고 하는데 Servername 이 없다는 메시지가 출력되었다.
AH00558: httpd: Could not reliably determine the server's fully qualified domain name, using 127.0.1.1. Set the 'ServerName' directive globally to suppress this message

아.. 뭐지 실행이 안되는건가 하고 찾아봤는데 https://askubuntu.com/questions/256013/apache-error-could-not-reliably-determine-the-servers-fully-qualified-domain-n
문제가 되지는 않는다고 하니까 일단 넘어가야지
ps -ef | grep httpd | grep -v grep 명령어 실행

ps 는 preocess status 의 준말로, 현재 실행중인 프로세스의 목록을 보여준다.
-ef 옵션에서 e는 모든 프로세스를 출력하라는 뜻이고, -f 는 풀 포맷(UID, PID 등)으로 보여주겠다는 뜻이다.
자세한 참고 링크 : https://arer.tistory.com/150
netstat -anp | grep httpd 명령어 실행

* netstat 이 없을시 아래의 명령어로 설치
$ apt-get install net-toolsnetstat 은 네트워크 연결상태, 라우팅테이블, 인터페이스 상태등을 보여주는 명령어이다.
앞에 붙은 anp 옵션에서
a는 all 으로, 모든 네트워크 상태를 출력한다.
n 은 numeric 으로, 도메인주소를 숫자로 출력한다.
p는 program 으로, PID(processor ID) 와 사용중인 프로그램명을 출력한다.
자세한 참고링크 : https://websecurity.tistory.com/103
curl http://127.0.0.1 명령어 실행

* curl 이 없을시 아래의 명령어로 설치
$ apt-get install curlcurl 은 command line 기반의 웹 요청도구이다. curl [options] <url> 형태로 사용.
curl 뒤에 붙인 url 주소에 따른 HTML 정보를 콘솔에 출력해주는 역할을 한다
6. httpd 서비스 등록 (앞으로 자동 시작이 될것이다)
/usr/local/apache2.4/bin/apachectl 이라는 파일을 /etc/init.d/httpd 에 복사해준다.
$ cp /usr/local/apache2.4/bin/apachectl /etc/init.d/httpd
vi 편집기로 주석을 추가해준다.(안해줌)
$ vi /etc/init.d/httpd# chkconfig: 2345 90 90
# description: init file for apache
# processname: /usr/local/server/apache/bin/apachectl
# config: /usr/local/server/apache/conf/httpd.conf
# pidfile: usr/local/server/apache/logs/httpd.pid
아파치 서비스를 등록해준다.
$ update-rc.d httpd defaults
*** httpd.conf 파일을 수정하여 serverName 을 바꿔줄 수 있다.
serverName 을 바꿔주면 apache 를 실행시킬때
AH00558: httpd: Could not reliably determine the server's fully qualified domain name, using 127.0.1.1. Set the 'ServerName' directive globally to suppress this message
이런 메시지가 출력되지 않는다.
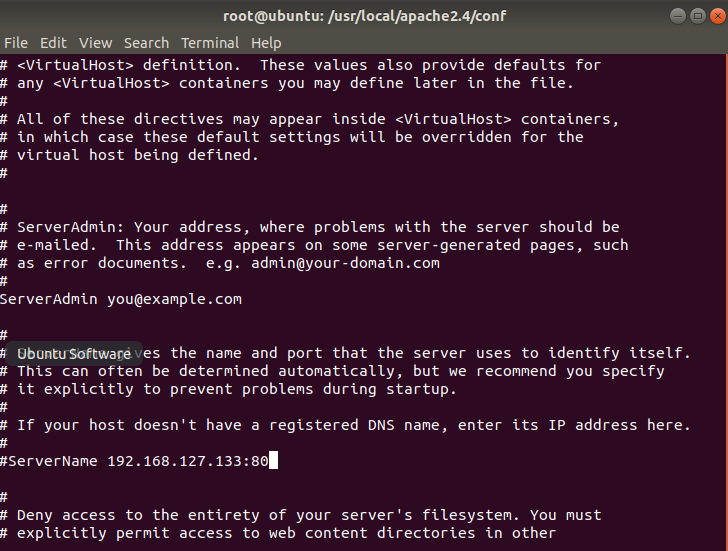
ServerName 을 리눅스서버의 아이피인 192.168.127.133:80 으로 바꿔주었다.
참고 사이트 >>>
https://goddaehee.tistory.com/75
https://www.netnea.com/cms/apache-tutorial-1_compiling-apache/
'Language > [PHP]' 카테고리의 다른 글
| Ubuntu 18.04 + Apache 2.4.41 + Mysql 8.0.19 수동설치하기 (2) | 2020.01.20 |
|---|---|
| Apache - 동적공유객체 DSO 란? (0) | 2020.01.20 |
| APM 개발환경 구축하기(3) - 우분투 18.04 에 APM 설치하기 - Apache (0) | 2020.01.17 |
| APM 개발환경 구축하기(2) - 우분투 18.04 에 APM 설치하기 (0) | 2020.01.17 |
| APM 개발환경 구축하기(1) - 가상머신과 리눅스 (0) | 2020.01.17 |
